Paper Pumpkin is Stampin' Up's monthly subscription box. August’s “Sweet Sunflowers” kit included components for 9 cards—3 each of 3 different designs—along with matching envelopes. Kits always include an exclusive stamp set, a mini ink cube, embellishments, and adhesives. In August, we got a bonus 2nd ink pad and some honeycomb gold foil sheets too!

The intended projects are always fun, but I love to find different ways to use the kits and show their versatility.
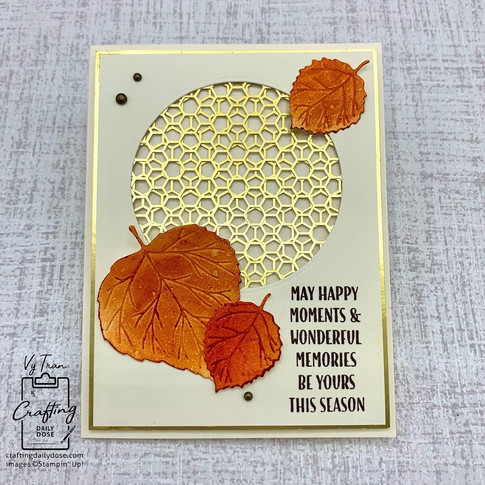
Those honeycomb gold foil sheets that we got as a bonus are gorgeous! Layer 2 of them together for lots of different looks. When you offset them, even a slight shift will create a new pattern, so have fun experimenting! You can even flip one or both of them over to the white side for even more combinations.
I put the layered designs behind a window and paired them with some aspen leaves. I centered my piece of Very Vanilla cardstock on top of one of the gold foil sheets so there'd be a rim of gold around the edge. If you want to save as much of the honeycomb pattern as possible, you can cut out some of the parts that won't show, but I left mine intact. To attach the 2nd piece of gold foil, I used Tear 'n Tape. I left the backing on so that I could prop up this panel on Dimensionals; that way, the other side of the Tear 'n Tape won't stick to the cardbase.

To create the leaves, I randomly blended Poppy Parade, Cajun Craze, Pumpkin Pie, and Crushed Curry inks onto Basic White cardstock and did some quick sprays of water with a Stampin' Spritzer. To darken the leaf veins, I very gently tapped ink onto the dies before cutting. This is a lot easier to do if you have the Stampin' Spots. I've collected mine from past Paper Pumpkin kits, but you can also create your own using blank ones and ink refills.

I put some washi tape on the back of the die to use as a handle, but know that you'll definitely get inky. I'm not a particularly tidy crafter and don't mind making a beautiful mess, but I am going to recommend that you pause after cutting out the leaves and clean off all the ink--from your hands, work surface, the dies, and the cutting plates. You don't want to accidentally transfer that ink to the rest of your card or future projects!

Measurements:
-Very Vanilla Thick cardstock
8-1/2” (W) x 5-1/2” (H), scored at 4-1/4” along the long side
3-7/8” (W) x 5-1/8” (H), cut with largest of the plain Layering Circles dies
-Basic White cardstock
Scraps to fit ONE large and THREE small Aspen leaves
For the inside of the card, I added the edging from one of the gold foil pieces, along with the last leaf.
September 10th is the last day to sign up for next month’s kit, called Spooky Treats. This kit will make 18 treat boxes, 2-1/2" x 3" x 1", 6 each of 3 designs. We'll get an Orchid Oasis mini ink cube, which is one of the new In Colors! If you‘re in the U.S. and would like to subscribe to Paper Pumpkin with me, I’ll send you a handmade thank you card, and I’ll be sure to let you know when I post new ideas!

Shoppable Supply List:


Commentaires